
Why did I come up with this bag? 3 reasons: 1-Because I have never used a stabilizer and don't really want to? 2-I wanted to use fabric I like, not pre-quilted fabric and I wanted the quilted look and feel and stability. 3-I wanted lots of big pockets for diapers/wipes, sippy cups, snacks, crayons/toys, my wallet/keys/cell phone, etc. All things need their place and should be easy to grab. So here we go… And please read through the entire tutorial before you start…looking ahead at the pictures helps you see what my words did not explain very well...and click on all pictures for more detail. Good Luck!
1-Free motion 1 yard of fabric onto a piece of pre-quilted material (Here is a tutorial on free motioning if you need to start there
Crazy Mom Quilts Free Motion Tutorial

2-Cut 19 x 28 inch piece leaving the 28 side open to cut the long straps from

3-Cut outside 8 x 9 inch pocket
.JPG)
4-Fold top of pocket down twice and sew it to hide the raw edge
.JPG)
.JPG)
5- On pocket fold and pin under other 3 raw edges
.JPG)
6-Pick a spot (I like to match the pattern up), pin in place and sew 3 sides onto the outside of the bag (leaving the top of the pocket open…I’m just reminding you not sew your pocket closed!)
.JPG)
7-The body: fold in half right sides together, pin and sew 2 side edges closed (leaving the top of the bag open)
.JPG)
8-Make triangles 4 inches and pin, then sew…now the outside body is finished! (this forms the rectangle in the bottom of your bag and gives it body, do not cut these off) Then turn this outer body right side out.
.JPG)
.JPG)
.JPG)
You should be here…Yeah! ! !
.JPG)
9-Now cut liner 20 x 28 inches from a pre-quilted material
.JPG)
10- Cut 2 pieces of pre-quilted material 13 x 20 inches to make the inside pockets with
.JPG)
11-Fold down 20 inch side of inside pocket fabric twice and sew to hide the raw edge (Yes I am still in my robe and I have hairy arms, moving along now…)
.JPG)
12-Pin wrong side on the right of liner turning the bottoms of each pocket piece under and iron. Leave 3 ½ inches open between the pockets
.JPG)
13-Sew the bottom of the pockets straight across onto the liner
14-Sew 2 pocket slits 6 inches from each side (or as many you like…one for diapers, one for sippy cup, one for snacks, etc)
.JPG)
.JPG)
.JPG)
15- Fold liner in half right sides together and sew the 2 sides closed (like Step 7)
16-Make triangles 4 inches, pin and sew (like step 8) Do cut the triangles off on the liner. Ta-Da your liner!
.JPG)
17-Lets make straps. Cut 2 pieces of self quilted material 33 x 5 inches
.JPG)
18-Fold the short side in half to 2.5 inches right sides together and sew 33 inch side…same for both straps
19-Turn straps right side out. Iron flat. Sew a seam or two to give the strap some body (I free motion these to match, I hope you can see this in the 2nd picture)
.JPG)
.JPG)
20-Let’s make the ruffles. Cut 2 pieces 6 x 44 inches (or the width of your material, this leaves finished edges) not quilted material. Fold in half to 3 inches with wrong sides together and sew 2 rows of basting stitches (long stitches) along the 44 inch side.
.JPG)
21- Scrunch ruffles until each are 20 inches long and tie off ends with the thread (if you do not know how to do a basting stitch…go here and learn really quickly…
Gathering Fabric into Ruffles
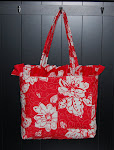
22- Putting it all together. Iron and pin down edge of the OUTER BODY to hide the raw edge about ½ inch. Then Pin the ruffle to it and sew ruffle in place (I use the inside of my presser foot as my guide) Sorry for switching bags on you…I didn’t photo this well when I made the red bag)
.JPG)

23-Iron and pin down the liner to hide the raw edge. See pictures above.
24 -Slip the liner into the shell (already did this in picture sorry)
25-Place straps between the liner and shell with pins (I usually put them in about 1 inch) but place with the straps to your comfort level before sewing them in.
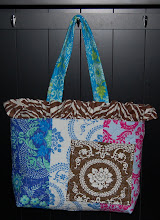
26- Pin liner and outer body together and stitch in the ditch of the shell. Ta Da! Finito! Good Job! If it is not that cute, try again…now you know what you are doing. Finished size about 18" wide, 12.5" high with ruffle and 3" deep.
Red Floral Diaper Bag

Jennifer Paganelli's Sis Boom Patchwork Fabric Quilted Diaper Bag

I will work on posting a printable version...Please comment or email me with questions or problems...and I'll try to address them. Thank you...and Enjoy my 1st tutorial!
Ps. You should have enough material left over to make a matching wallet...so scoot over to That Darn Kat and she'll teach you how.
That Darn Kat Quilted Wallet Tutorial
Pss. Printable tutorial is now ready...see side bar for link.
CLICK HERE TO JUMP TO MY HOME PAGE


19 comments:
There is something so comfy about a quilted look...great tutorial!
This is so pretty! I found your blog via CraftGossip earlier today. What a wonderful project! I'd love to link to it as well if you didn't mind.
What a great idea, and so gorgeous fabric! Nice of you to share all the details :-)
hi there. i'm in the process of making this cute bag but i'm stuck on the straps because i can't turn these darn things! (i've never been very good at this in the first place.) i don't have a safety pin big enough so i've been trying to use a dowel to work it through but this bulky quilted fabric is not working very well! any tips?
hi Karrie! ug I am sorry this is a tough step. i just use my fingers...and go very slowly kinda like pinch off a small piece of bread with your pointer finger and thumb and pulling until the fabric is not bulky...pinch off a little piece and smooth it out? i hope this helps? i'd love to see your finished bag too!
Hi there!
i have link ur tutorial in http://diybaglover.blogspot.com/.
Hope u dont mind :)
Thanks for sharing your diaper bag with us...I have put a link to you on my freebies blog if thats okay...hugs Khris
I know this is an older post, but just in case you are still listening...how much fabric did you use? I am such a beginner and need everything broken waaaaay down to be able to understand. I really want to attempt this, but I'm not sure how much fabric I need to buy. Also, if I can't find/afford prequilted fabric, can I use a stabalizer instead? When/where would I add that?
Hey Kristen,
I have not used stabilizer before...that's actually why I came up with the tut. So guessing...I would attach the stabilizer to the wrong side of the fabric you want to be the outside main fabric...and go from there? (For example attach stabilizer to the wrong side of the red floral fabric)
A plain solid or gingham pre-quilted fabric (the real name is single face quilted fabric) can be found at most any fabric store...like JoAnn's (you can always google and find a 40% off coupon for JoAnn's) Hancocks or Walmart usually has some pre-quilted as well...at max it should cost you about $8 for one yard without a coupon...less than $5 per yard with a coupon.
And how much...2 yard of pre-quilted fabric and 1 yard of what you want to use on the outside of the bag (like the red floral fabric)
Hope this helps!
And here are some links to some of the pre-quilted fabric
http://www.hancockfabrics.com/Single-Face-Quilted-Pink-Solid-Fabric-Front-Page_stcVVproductId48182815VVcatId537258VVviewprod.htm
http://www.joann.com:80/joann/catalog/productdetail.jsp?pageName=search&flag=true&PRODID=prd18960
Hi, is stabilizer the same as interfacing?
Sorry Rachel...I do not use either one...
Perhaps this might help you...
http://www.sewgirls.com/quilting/stabilizer-vs-interfacing-108131-.htm
love the bag n the tutorial is easy to understand. terima kasih.
Love your tutorial but reading pink print is REALLY hard on the eyes especially when you're shifting back and forth from text to pic to text.
Debbie hampton300@cox.net
Hey Debbie,
Sorry you are having trouble reading this. Perhaps you could pull up the printable directions on the right side bar...and it is in black ink (pictures are visible there too).
Thanks for trying this...I'd love to see your bag when you are finished!
Corrie
This is a great tutorial! I am looking to make my own diaper bag since I can't find one in the stores that I really like. However, do you have a tutorial on how to insert a zipper? I really want to have a zipper for the main compartment so that if my bag tips over (which it always does in the car) everything doesn't fall out. Thanks in advance!
Sorry...I don"t work with zippers unless making pouches...Skip To My Lou has a great tutorial for zipper pouches! Thanks.
this looks way easier than i thought! definitely going to make this for when i have kids! :)
A size 10 blunt ended knitting needle is perfect for pushing the straps through(I use and old wooden one). Beautiful bag. Made one but had to improvise and ended up quite different but beautiful too! :) Thanks.
I love the idea of your bag! I'm going to make it as a shower gift if girly fabrics.
The only way I could find to print it was to highlight all the pages first. I like using a firm stabilizer, but your solution of using one sided pre-quilted fabric is interesting. (I just don't want to have to go out and buy some right now!) Thanks for sharing it. Sue
Post a Comment